Bright ideas: The best light painting tools for night photography

A common question is what light painting tools I recommend for light painting for night photography. Here’s what I recommend—and why.

I’ll start with the most inexpensive light painting choices and work my way up.

Light painting a vintage Model T. Night photography.

What is light painting?

Light painting is a term that is often used loosely to describe any addition of light to a night photograph. Really, though, light painting is a technique that uses a handheld light source to illuminate a scene during a long exposure. You are quite literally painting light on a subject. Your light source is your brush. Night photographers have used this technique for many decades.

Lighting Arch Rock, Joshua Tree National Park, CA.

Inexpensive but high quality options for light painting

I wrote an in-depth article about purchasing light painting tools for cheap. I would encourage you to read this and see why I recommend what I do.

Wurkkos FC-11 LED flashlight. It also has a handy magnet.

For white light only, I would recommend the Wurkkos FC-11 (review here). It holds detail well and has a pleasing warm white light.
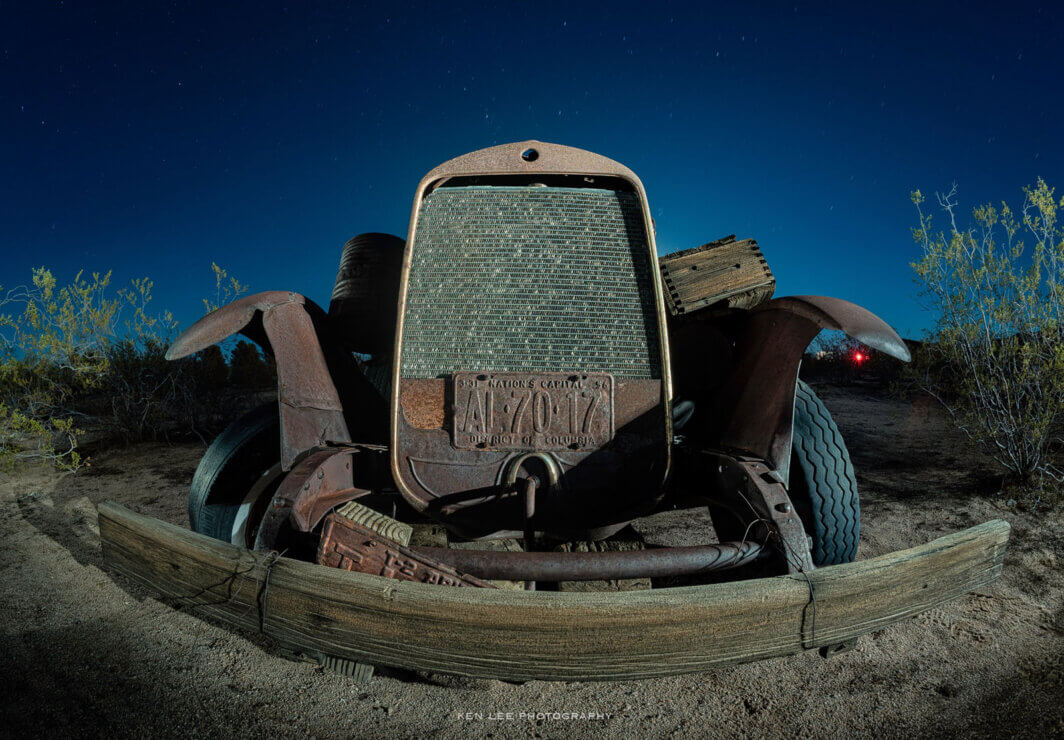
An abandoned vintage auto. I used a Wurkkos FC-11 LED light to light paint this vehicle during the exposure.

What if I want color?

Use some gels from a $5 Roscolux Swatchbook sample booklet. Simply put these in front of your flashlight. Bam. Done.

Another option is the Colorshine light. I have never used this, but hear that it produces good results. Best of all, the light typically sells for under $33. It produces “10 different LED colors with flash and smooth color-change modes” which they describe as “red, green, blue, orange, turquoise, purple, yellow, cyan, violet, and white.”

Read about more inexpensive color options for light painting lights here.

RGB LED Panels for light painting

Lume Cube RGB Panel Pro 2
Lume Cube RGB Panel Pro 2, perched on a tiny tripod. Of course, you can use this handheld, as I did for many photos.

Another possibility is to use an LED panel instead of a flashlight, simply using it as a handheld light instead of a stationary light (which isn’t really light painting anyway). I use a Lume Cube RGB Panel Pro 2.0, which has a high-quality light and holds detail well. You can read an in-depth review of the Lume Cube RGB Panel here.
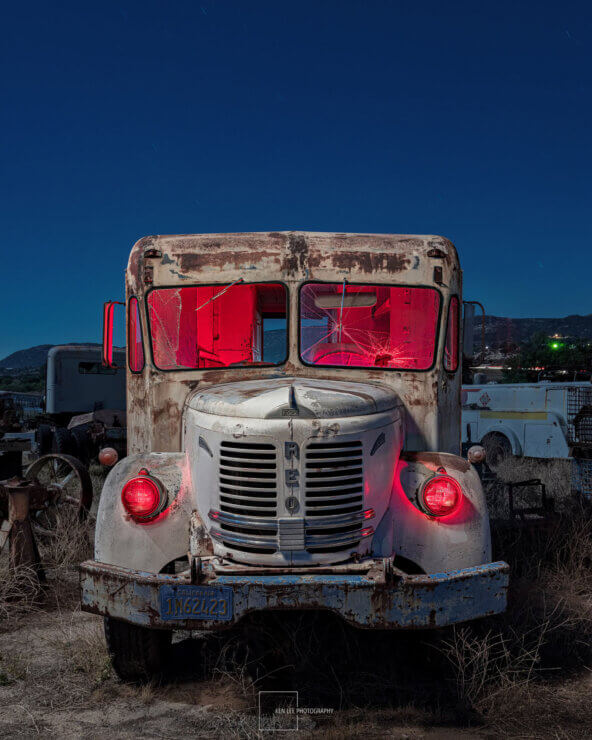
Reo Speedwagon. I used a handheld Lume Cube RGB Panel Pro 2.0 to light paint the exterior of the REO Motor Works truck from a similar angle as the moon. I used the ProtoMachines LED2 to light the interior and the headlights red.
Reo Speedwagon. I used a handheld Lume Cube RGB Panel Pro 2.0 to light paint the exterior of the REO Motor Works truck from a similar angle as the moon.

This is a high-quality light that you can use for handheld light painting. You may need to wrap black Cinefoil or something similar around it to prevent the panel from shining into the camera lens if you are walking through the scene.

Another possibility is a Luxli light panel. There are some that have accessories that surround the light, similar to what you are doing with Cinefoil, so it prevents you from inadvertently shining the light into the camera lens and causing giant streaks.

High-quality LED RGB flashlights for light painting

The RGB Critter 2.0 from Ants on a Melon. It comes in several different colors.
The RGB Critter 2.0 from Ants on a Melon. It comes in several different colors. This is shown without an attachment.

Currently, the highest-quality LED flashlight with RGB that I know of is the Ants on a Melon RGB Critter 2.0. It has a high-quality light and holds detail well. You can read an in-depth review of the RGB Critter 2.0 as it pertains specifically to light painting here.

The challenge of the RGB Critter is that the user interface is challenging. It involves either pressing buttons simultaneously or pressing a sequence of buttons to change colors, brightness, and functions. It produces 39 colors, all rich and vibrant. However, you have no control over the saturation. You cannot produce any other colors besides the 39 colors. Still, though, those 39 colors would be more than enough for most people. The challenge here is primarily the confusing user interface. This also includes through the colors to reach another color instead of going straight to it.

The highest quality LED RGB flashlight for light painting

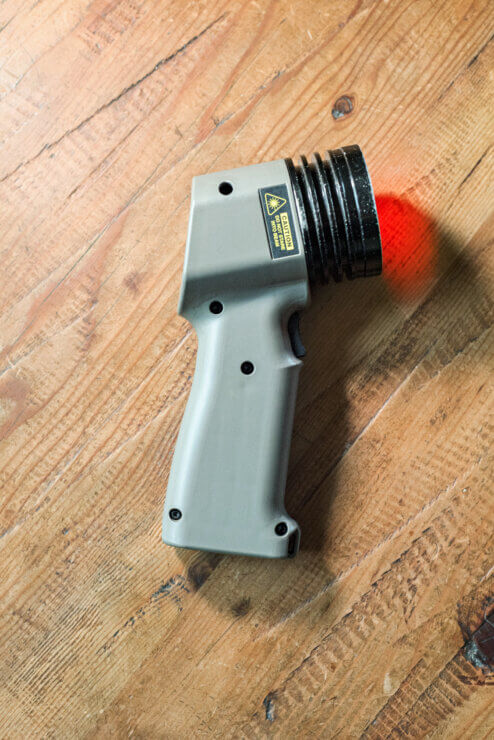
ProtoMachines LED2
ProtoMachines LED2

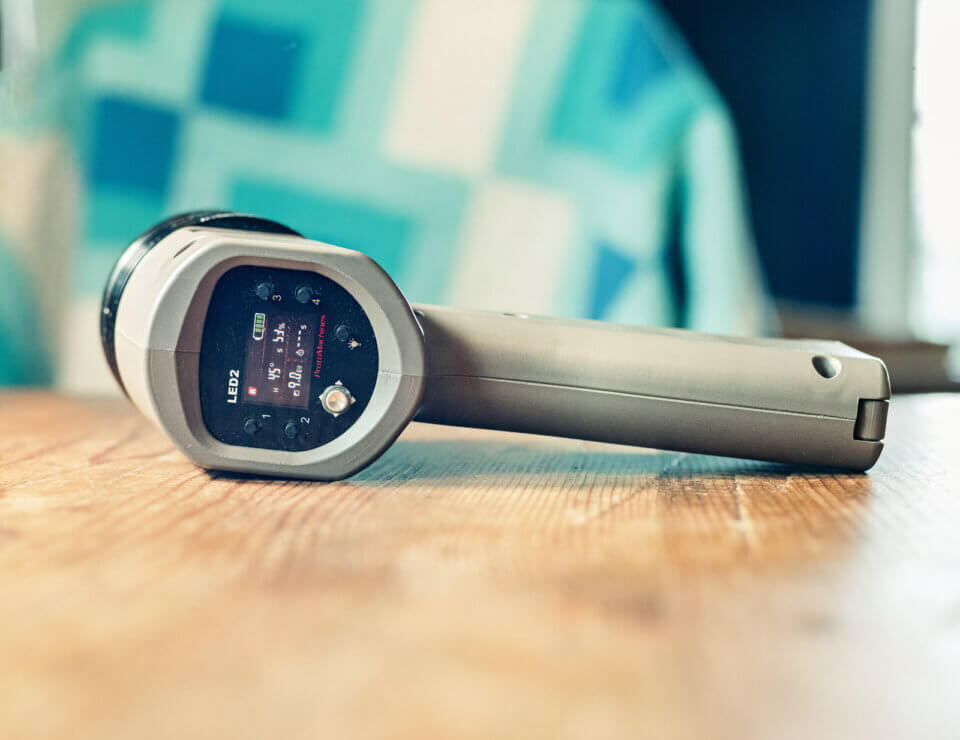
The light that I use, as well as the one all the Nightaxians use, is a ProtoMachines light. It’s meticulously designed for light painting scenes and subjects. The ProtoMachines light offers easily accessible, on-the-fly control over saturation and brightness from 1-100%, a timer, user presets, and more. The form function is perfect.

ProtoMachines LED2
ProtoMachines LED2

Before you get too excited, there are two issues.

One is that they are not cheap. Their products range in price from the Radium LED light wand at $249 to the LED8 at $559.

The other is that, as of this writing, they are currently not available.

They are worth every cent, in my opinion. The form factor, quality of light, and ease of use inspire creativity are second to none. They are, in short, the best.

They are so good that I would encourage you to ask to get on the ProtoMachines waiting list so you can be notified when they release new products. Many of us are hoping for this.
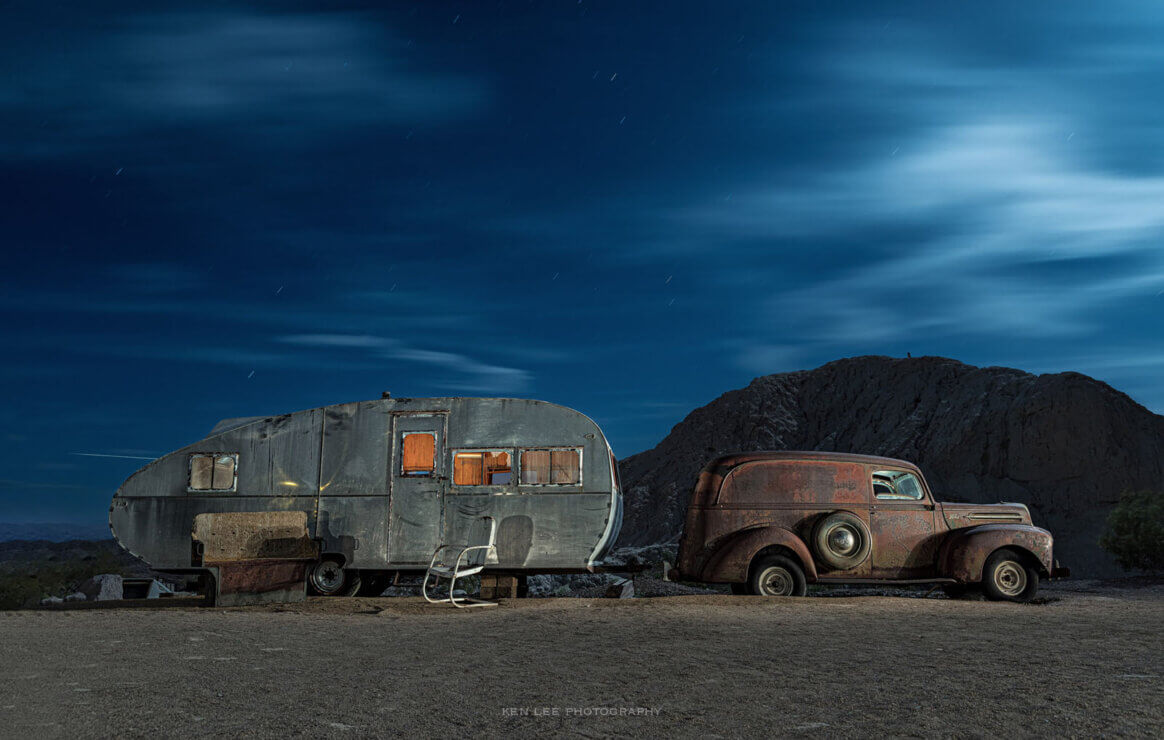
Night photo, Nelson ghost town Nevada
Night photo, Nelson ghost town Nevada. I used a ProtoMachines LED2 to light paint this during the exposure.

Light painting subjects – what do you use?

Do you have any light painting tools that you would recommend? Please leave them in the comments!

How to dress warmly while packing lightly for winter

Dressing warmly while packing lightly? That seems like a contradiction. However, it is possible to do it without spending tons of money.

Packing light for air travel

Ideally, what I strive for is to travel while having all my belongings in two bags.

My personal bag, a Tenba Solstice 20L camera bag, easily slips under the seat. I keep some snacks, earbuds, and a USB charger inside along with two DSLR cameras, two to three lenses, and photography accessories.

I put my clothes, including many of the warm clothes, in a WANDRD Hexad Access Duffel Backpack. This allows me to cruise through airports, stuff the duffel bag onto the overhead bins. Inside, I am able to fit the clothing I describe below plus more. Also inside are my camera battery chargers, toiletries, several bamboo T-shirts, and a tripod. Because I use warm clothes that are packable, I am able to fit this all in for trips that are over a week long without an issue.

A cold night in Lake Tahoe, California.

Feet

I like to wear waterproof boots, which I of course wear on the plane. If your boots are not waterproof, you can spray it with Scotchgard or Kiwi. If you are going to remain warm during the winter, this also means remaining dry. I also spray the bottom of my pants with Scotchgard.

I wear Time May Tell merino wool socks. If it’s cold out, I wear two. If it’s really really cold, I will also use Hot Hands Toe Warmers. These are single use air-activated heat packs. So far, the merino wool socks have worked well for me. They have lasted through a lot of hiking. Furthermore, since merino wool has anti-bacterial properties and wick away moisture, they don’t stink. Fantastic. As a bonus, they’re not expensive.

Legs

Admittedly, I could do better here. I currently have been wearing Duluth Trading pants because they’re cheap and warm. They’re not waterproof, however. That’s where the Scotchgard spray comes in. I spray the pants with that and it seems to work. However, something that does better at staying dry and is more flexible might be a better choice. A good choice might be pants that shed water and are fleeced for extra warmth.

If it’s really cold, I also wear a heavyweight base layer from 32 Degrees. It’s warm and nice. It’s also $7.99. That’s not a misprint. If it’s really cold, I tuck the base layer inside the top of my socks.

Torso

Frosty the Snowman doesn’t need to keep warm. But you do.

32 Degrees to the rescue again. 32 Degrees is a great place to pick up really inexpensive clothing that keeps you warm. I start with a heavyweight base layer. The top is also $7.99. Not bad, eh?

I follow this up with an Unbound Merino hoodie. This is admittedly not cheap, as it currently sells for $175, but you can find it on eBay for cheaper. But what this does is regulate temperature while remaining dry and keeping bacteria at bay. In other words, once again, it doesn’t stink. You can where this for multiple days and it will not smell. Nice. Unbound Merino also has socks, base layers, sweaters, and lots of other goodies. They will cost you a lot more than some of the other companies, but their products are solid, and their merino wool incredibly soft.

Then, it’s back to 32 Degrees, this time with an ultralight down packable jacket. It’s not the warmest, but with layers, it works fine.

If you want greater warmth while still being packable, this Coalatree camper hooded jacket looks promising. You can pack it into a stuff sack, it’s allegedly good down to 20 degrees Fahrenheit (-6.66 Celsius), and it has plenty of pockets for that night photographer on the go. It also does well at keeping you dry.

Hands

Palmyth $20 photography gloves.

As with your feet, it’s important to keep your hands warm. I wrote an article entitled “Can you get good warm photography gloves for under $20?” Good news! It turns out you can. But for some of these cold evenings I’ve experienced lately, Hot Hands can help quite a bit. I also have ski gloves should it come to that, but so far, the Hot Hands have worked out quite well.

Head

Right now, I am wearing a thick wool cap to keep my head warm. But during one of our night photography photo shoots in Kansas, the temperature dropped to as low as 15 degrees Fahrenheit (-9.44 Celsius). This was brutally cold. Although I was otherwise warm, my face got incredibly cold. I noticed that I was starting to have trouble talking a bit due to how cold my mouth and face were. Next time, I will use a balaclava such as this by Turtle Fur. It’s more breathable, and I don’t feel that I will ordinarily need their heavier choices.

A word about Hot Hands

I’ve mentioned Hot Hands products several times now. These are handy to keep around. They can also act as dew heaters if you wrap them around your lens. But more importantly, they can keep your hands and feet warm during extreme cold.

They are wasteful, as they are single-use air-activated heat packs. You tear open the plastic packaging. They come in contact with air and become hot, lasting for several hours. Then, unfortunately, you throw them away. I rarely use these, so I justify it by thinking that it’s better that my hands and feet stay very warm in subfreezing temperatures. And they do work very effectively.

However, if I were to photograph in subfreezing temperatures on a regular basis, I would look into something else. If you have any suggestions for something less wasteful but still effective, please let us know in the comments! Also, let us know any tips you might have for dressing warm while packing light!

VISIT ME, VISIT ME!

BOOKS AND PRINTS:
Head on over to the Ken Lee Photography website to purchase books or look at night photography and long exposure prints and more.  My books are available there and Amazon, Barnes and Noble, Target, Booktopia, Books A Million, IBS, and Aladin. If you enjoy the book, please leave a nice review, thanks!

NIGHTAXIANS VIDEO YOUTUBE PODCAST:

Night photographers Tim Little, Mike Cooper and I all use Pentax gear. We discuss this, gear, adventures, light painting, lenses, night photography, creativity, and more in this ongoing YouTube podcast. Subscribe and watch to the Nightaxians today!

SOCIAL MEDIA:
Ken Lee Photography Facebook Page (poke your head in, say hi, and “like” the page if you would, uh, like)
Instagram

PODCAST:
Behind the Shot video podcast – interview February 2020

VIDEO PRESENTATION:

How We Got the Shots: Five Photographers, Five Stories – Night Photo Summit 2022

VIDEO INTERVIEW:

Ken Lee’s Abandoned Trains Planes and Automobiles with Tim Little of Cape Nights Photography
Conversation about night photography and my book with Lance Keimig of National Park At Night

ARTICLES:
A Photographer Captures Haunting Nighttime Images of Abandoned Buildings, Planes, and Cars in the American Southwest – Business Insider by Erin McDowell
A Photographer Explores Southern California’s Desert Ruins – Los Angeles Magazine article by Chris Nichols


Create free QR codes from this website in four easy steps

Need to create QR codes for your website, phone, SMS, location, WiFi, event, or whatever? Check out this free website!

My fun disclaimer

I discovered this site that creates free QR codes that works quickly, easily, and effectively. No, I have nothing to do with the QR code website. I don’t know anyone there, and am not sleeping with anyone from the company.

I needed to create a QR code that led back to my photography site for an upcoming exhibition of my night photography at the Hi Desert Nature Museum in Yucca Valley, CA. How could I do this?

Enter the monkey

The QR Code Monkey, to be exact. I tried one or two others, and they either required me to sign up or were more complicated. This website, on the other hand, had everything laid out logically. Furthermore, I could choose from a number of different designs and shapes.

I had done a little bit of poking around before finding this site which does this easily for numerous kinds of content. Even better, it allows you to place your logo within the QR code if you wish! People can hold the cameras of their phones up to this code, press the prompt, and are immediately whisked to my website … or all sorts of other contents.

Let’s go over the four easy steps to QR Code glory.

Step 1: Enter content

QR Code Monkey screenshot

You’ll need to select the tabs that say “URL,” “Text,” and so forth. Then enter your website or email or other information that you wish people to have.

Step 2: Set colors

QR Code Monkey screenshot

What color do you want your colors to be? I went with black, the default color. I like the QR code to have a lot of contrast in the hopes that the camera phone will pick it up a little easier in dark areas. As always, your mileage may vary.

Step 3: Add logo image

QR Code Monkey screenshot

This is where you can personalize the appearance by adding your logo in the center of the code.

Step 4: Customize design

QR Code Monkey screenshot

This is probably the area where you will spend the most time. The changes are almost instantaneous. I found that the Body Shape that was third from the left seemed to look the best for my logo, so I went with it. I decided to go with a simple square Eye Frame Shape. But you certainly could have a lot of fun trying to design your QR code.

After that, you simply select the quality of the image that you want to have, and press the blue button that says “Download PNG.” That’s it!

What say you?

There’s many websites that create QR codes. Do you have one that is your favorite? How do you create QR codes? Leave your comments below!

VISIT ME, VISIT ME!

BOOKS AND PRINTS:
Head on over to the Ken Lee Photography website to purchase books or look at night photography and long exposure prints and more.  My books are available there and Amazon, Barnes and Noble, Target, Booktopia, Books A Million, IBS, and Aladin. If you enjoy the book, please leave a nice review, thanks!

NIGHTAXIANS VIDEO YOUTUBE PODCAST:

Night photographers Tim Little, Mike Cooper and I all use Pentax gear. We discuss this, gear, adventures, light painting, lenses, night photography, creativity, and more in this ongoing YouTube podcast. Subscribe and watch to the Nightaxians today!

SOCIAL MEDIA:
Ken Lee Photography Facebook Page (poke your head in, say hi, and “like” the page if you would, uh, like)
Instagram

PODCAST:
Behind the Shot video podcast – interview February 2020

VIDEO PRESENTATION:

How We Got the Shots: Five Photographers, Five Stories – Night Photo Summit 2022

VIDEO INTERVIEW:

Ken Lee’s Abandoned Trains Planes and Automobiles with Tim Little of Cape Nights Photography
Conversation about night photography and my book with Lance Keimig of National Park At Night

ARTICLES:
A Photographer Captures Haunting Nighttime Images of Abandoned Buildings, Planes, and Cars in the American Southwest – Business Insider by Erin McDowell
A Photographer Explores Southern California’s Desert Ruins – Los Angeles Magazine article by Chris Nichols


Stop your light painting from looking flat and dull right now

Do you light up your subjects only to find that they look flat and dull? Look no further. We are here to help with your light painting!

The most common mistake that creates flat, dull lighting in your photos

Above: Differences in handheld light painting angles. The left photo is lit while standing directly in back of the camera. The right photo is lit from camera right and to the side of the columns. In both examples, I am illuminating the columns with the handheld flashlight at the same distance, brightness, and amount of time. The only thing that has changed is the angle (where I am standing with the handheld flashlight).

Your light painting can look as boring as dirty dishwater if you do not alter the angle that you light paint at relative to your camera.

Here’s an example. When someone takes a photo of you using a flash from a camera phone, do you feel it’s flattering? Of course not. The lighting looks unnatural, flat and often, over-exposed. In short, it looks ugly.

If you light paint from behind your camera, you’re using the same angle. And you have even less reason to be doing this than using the flash using your phone’s camera. You have a handheld flashlight, after all. You can light paint from any angle you choose.

Above: Examples of illumination from different angles. The first one is lit while standing directly behind the camera. All illumination is for the same amount of time and distance from the flashlight to the statue.

By light painting at different angles, you can create shadows. Shadows on the surface can create depth and detail. Even more than that, you can create mystery by using different angles.

Learn from looking at other images

Monument Rocks, Kansas on a 15-degree Fahrenheit night. Brrrrr!
Milky Way, Central California.
Made from 12 light frames (captured with a NIKON CORPORATION camera) by Starry Landscape Stacker 1.6.2. Algorithm: Median
Moundsville, West Virginia. How did I create this lighting? What angles did I use?

Have a look at the photos. Where am I standing? Why do these photos have detail and depth from the lighting? How can you use lighting angles like this in your own photographs? 

Even better, learning about these angles can take your portrait, landscape, product, macro, and street photography to the next level. You can use available light to your advantage, being aware of how it falls on your subjects. And you may also use additional lighting to create more texture, keeping boring, flat lighting at bay.

Going above and beyond with your light painting

After mastering angles of lighting, you can sometimes throw in a pop of color to really set your light painting apart. Use this for human-made subjects as well as landscape. An LED flashlight with colored plastic bags, Roscolux gels, or RGB LED lights such as the RGB Critter 2.0 can really create some fantastic colors.

Night photo with Pentax camera. Abandoned mine, Mojave Desert. Pentax K-1. What angles were used to create these details and shadow? How do these colors create a particularly unique quality that sets this photo apart from other photos you've seen?
Night photo with Pentax camera. Abandoned mine, Mojave Desert. Pentax K-1. What angles were used to create these details and shadow? How do these colors create a particularly unique quality that sets this photo apart from other photos you’ve seen?

VISIT ME, VISIT ME!

BOOKS AND PRINTS:
Head on over to the Ken Lee Photography website to purchase books or look at night photography and long exposure prints and more.  My books are available there and Amazon, Barnes and Noble, Target, Booktopia, Books A Million, IBS, and Aladin. If you enjoy the book, please leave a nice review, thanks!

NIGHTAXIANS VIDEO YOUTUBE PODCAST:

Night photographers Tim Little, Mike Cooper and I all use Pentax gear. We discuss this, gear, adventures, light painting, lenses, night photography, creativity, and more in this ongoing YouTube podcast. Subscribe and watch to the Nightaxians today!

SOCIAL MEDIA:
Ken Lee Photography Facebook Page (poke your head in, say hi, and “like” the page if you would, uh, like)
Instagram

PODCAST:
Behind the Shot video podcast – interview February 2020

VIDEO PRESENTATION:

How We Got the Shots: Five Photographers, Five Stories – Night Photo Summit 2022

VIDEO INTERVIEW:

Ken Lee’s Abandoned Trains Planes and Automobiles with Tim Little of Cape Nights Photography
Conversation about night photography and my book with Lance Keimig of National Park At Night

ARTICLES:
A Photographer Captures Haunting Nighttime Images of Abandoned Buildings, Planes, and Cars in the American Southwest – Business Insider by Erin McDowell
A Photographer Explores Southern California’s Desert Ruins – Los Angeles Magazine article by Chris Nichols


Stop describing AI-generated art as photos!

You type word prompts into a field. A computer spits out an AI-generated image. Sorry, that’s not a photo, and you’re not a photographer.

Call it something else. It’s an image, a picture, AI-generated art or a computer doodle. It doesn’t matter. Just don’t call it a photo.

A mechanical Prompt Engineer in action, typing keywords to create AI-generated art. Wheeee!

Why ain’t it a photo?

I’m glad you asked. We create photographs using a camera. The camera lets in light. The light falls on light-sensitive material such as a sensor or film. Then the image is magically rendered visible through chemicals or digital means.

Did you notice something? In the description of how to create a photograph, I used the word “light.” Twice.

Photograph

Above: Real photographs made with light. Just as Sir John Herschel intended. “Light painting” seems to take on extra importance here, doesn’t it?

This isn’t just semantics. It’s in the name. “Photo” means “light”. “Graph” means “something written.” It may be all Greek to you, but that’s why I’m here to break it down.

Sir John Herschel, photography pioneer, coined the term “photograph.” He won out over “photogene,” “heliograph,” “photogram,” “sunprint,” and “sun-picture.” Interesting how all those names have to do with light, isn’t it?

This is AI-generated art of someone using a camera to create a photograph. I hope this isn’t too confusing.

Not a photograph

What’s not a photograph? Simple. Something that doesn’t involve light.

Typing words into a field to instruct an artificial intelligence program running on computers doesn’t involve light at any time. If you instruct AI to create a picture of a spotlight, it doesn’t involve light. Even if you wear a headlamp while typing, it still doesn’t involve light. No photons were used in the making of that image.

“I am the Duke of Digitative Drawing. This AI machine will do my bidding.”

If I’m not a photographer, then what am I?

Only you or perhaps your all-too-honest family members can answer that.

However, if you want a title, perhaps I can help. AI is the Wild West! You could have people address you by the following:

  • AI Generator General
  • Promptidigitator
  • Word Wizard
  • Prompt Queen
  • Prompt King
  • Prompt Wizard
  • Word Herder
  • Prompt Painter
  • Captain of Keywording
  • Word Wrangler
  • Prompt Engineer
  • Promptonaut
  • PAInter
In a poll in the Harvard student newspaper, 59% of students polled thought this was AI-generated art, not the night photograph it actually is.

Is this AI-bashing?

I’m not here to bash AI. In fact, I prefer to be very respectful just in case it reaches sentience (just kidding…or am I?).

Technology hurtles forward, and there’s not much we can do about it except to keep ourselves informed. If necessary, be wary. Almost all of us use AI whether we like it or not. It’s on our phones. It’s everywhere on the internet. And, of course, it’s in much of the technology around us. It’s used in much of the software we use. It’s even there when we call a business.

What’s not cool is to pass off your AI-generated art as a photograph. You know, that thing that’s created with light? We know that deception is wrong, right?

VISIT ME, VISIT ME!

BOOKS AND PRINTS:
Head on over to the Ken Lee Photography website to purchase books or look at night photography and long exposure prints and more.  My books are available there and Amazon, Barnes and Noble, Target, Booktopia, Books A Million, IBS, and Aladin. If you enjoy the book, please leave a nice review, thanks!

NIGHTAXIANS VIDEO YOUTUBE PODCAST:

Night photographers Tim Little, Mike Cooper and I all use Pentax gear. We discuss this, gear, adventures, light painting, lenses, night photography, creativity, and more in this ongoing YouTube podcast. Subscribe and watch to the Nightaxians today!

SOCIAL MEDIA:
Ken Lee Photography Facebook Page (poke your head in, say hi, and “like” the page if you would, uh, like)
Instagram

PODCAST:
Behind the Shot video podcast – interview February 2020

VIDEO PRESENTATION:

How We Got the Shots: Five Photographers, Five Stories – Night Photo Summit 2022

VIDEO INTERVIEW:

Ken Lee’s Abandoned Trains Planes and Automobiles with Tim Little of Cape Nights Photography
Conversation about night photography and my book with Lance Keimig of National Park At Night

ARTICLES:
A Photographer Captures Haunting Nighttime Images of Abandoned Buildings, Planes, and Cars in the American Southwest – Business Insider by Erin McDowell
A Photographer Explores Southern California’s Desert Ruins – Los Angeles Magazine article by Chris Nichols


How you can light paint without spending tons of money

Light painting is amazingly creative and fun. And you can do it for cheap. But first, let’s briefly describe light painting.

What is light painting?

Light painting is a term that is often used loosely to describe any addition of light to a night photograph. Really, though, light painting is a technique that uses a handheld light source to illuminate a scene during a long exposure. You are quite literally painting the scene with light. Night photographers have used this technique for many decades.

High quality flashlights for cheap

Ordinary LED flashlights work. But what really works well are ones that hold detail. 

“CRI” stands for “Color Rendering Index.” It’s a measurement of how natural colors render under artificial white light as compared to sunlight. It’s measured on a scale of 0 to 100. The closer to 100, the truer colors should look under its light. Generally, a CRI of 80 and above is considered good for a flashlight.

I have two suggestions. They’re both under $30 and they’re both over 90 CRI.

I purchased the Wurkkos light a while back after considering many options. You may read about how I looked for this inexpensive yet fantastic flashlight when you have a chance. In short, it has a pleasing warm light that holds detail, is fully adjustable brightness, is USB-rechargeable and is small. It often sells for under $30 on Amazon

Wurkkos FC11 LED flashlight

Above: I light painted the car with a Wurkkos FC11 LED flashlight.

ACEBEAM Pokelit AA EDC LED flashlight

Before I go any further, I have never used this flashlight. However, it has three brightness modes and a CRI of 90+, is small, and seems to have a warm white light. It takes AA batteries, so you cannot charge it via USB. Then again, it’s also well under $20 on Amazon as of this writing.

Milky Way, Trona Pinnacles, CA. It didn’t take much brightness to illuminate these large tufas in the distance.

What about brightness?

You’ll notice that I haven’t mentioned it. For some reason, people just getting into light painting subjects want super-bright flashlights. In my opinion, that’s one of the least important aspects of quality light painting (unless you are trying to light paint a distant mountain).

Made from 20 light frames (captured with a NIKON CORPORATION camera) by Starry Landscape Stacker 1.6.1. Algorithm: Median

Think about it. If you are using a high ISO for your camera, the last thing you typically need is an absurdly bright light. Your camera is super sensitive to light already, so a bright light gets you nowhere.

Even for the full moon night photography with light painting that I so often show here, a bright light is not really crucial. I prefer to light paint for a longer amount of time to get an “even coat of light.” In other words, I want the light to look nice and even, with no unwanted hot spots. 

The ProtoMachines LED2 is approximately 400 lumens. Most of the time, I use it at approximately ⅔ of its full brightness. The Wurkkos can go up to 1300 lumens if you really wish, while the ACEBEAM is 550 lumens at its brightest. Both are noticeably brighter than the ProtoMachines, in other words. 

What if I want to add color?

Above: I used blue gels and a blue plastic bag to color the light from a Streamlight LED flashlight for this photo of a poorly-parked bus.

Use some gels from a $5 Roscolux Swatchbook sample booklet. Simply put these in front of your flashlight. Bam. Done. Yes, it’s a little more fussy than being able to switch colors on the fly. These are some of the trade-offs from light painting without spending tons of money. However, it doesn’t impede you from getting great results.

Night photo with light painting of vintage automobile.

Are there LED flashlights that produce color that are inexpensive?

Yes. And because I am incredibly nice, I’ll mention one or two. I have not used any of these, but believe they can produce high-quality results.

Colorshine 10 Color Changing RGB LED Flashlight 3W RGB LED

Tim Little used this Colorshine light prior to getting a ProtoMachines light. He says that it produces really good results. Best of all, the light typically sells for under $33. It produces “10 different LED colors with flash and smooth color-change modes” which they describe as “red, green, blue, orange, turquoise, purple, yellow, cyan, violet, and white.” They have been selling this light for many years on eBay. No CRI is listed, but as I mentioned, Tim has gotten good results from it.

Wurrkos WK40 RGBW LED flashlight

Like the Colorshine flashlight, I have not used this. However, I’ve had good luck with the Wurkkos FC11, so I thought I’d mention this. This produces red, green, blue, and white colors, as the name suggests. I do not see CRI listed anywhere. You may charge it via USB, and it comes with a diffuser. It’s also compatible with various light painting brushes, meaning that you can screw them on if that’s important to you. I don’t know anyone who has this light.

Color gels vs. RGBW LED flashlights

Color gels are more of a hassle to use, fly away in the wind, and get bent and broken. However, they also offer far more flexibility with colors and are very inexpensive.

RGBW flashlights only produce red, green, blue, and white colors. However, that may be enough. You may also try to mix colors by light painting with one color after another to produce other colors. Of course, you can do this with gels as well, producing an even larger variety of colors.

Light painting an abandoned jail with ProtoMachines LED2.

What is so great about expensive RGB LED flashlights?

The advantage of a ProtoMachines LED2 or LED8 is that it produces every color in the RGB spectrum. It also allows you to control the saturation and brightness from 0-100%. It also has presets and is specifically designed for light painting subjects. You may slowly morph between colors of the spectrum if you wish. The light is extremely high quality. Also, the brightness between colors corresponds far better, as with most if not all RGBW lights, there can be a tremendous difference in brightness from one color to the next. 

Even with the RGB Critter 2.0 from Ants on a Melon, which is $125, there is an enormous difference in brightness from one color to the next.

When something is designed specifically for light painting subjects, there’s a quality and convenience factor that cannot be beat. 

However, it is comforting to know that one can create extremely high-quality images with items that are modest and inexpensive. There isn’t a huge barrier to entry here. I hope this inspires you to begin practicing adding extra creativity, texture, color, and illumination to your night photos.

VISIT ME, VISIT ME!

BOOKS AND PRINTS:
Head on over to the Ken Lee Photography website to purchase books or look at night photography and long exposure prints and more.  My books are available there and Amazon, Barnes and Noble, Target, Booktopia, Books A Million, IBS, and Aladin. If you enjoy the book, please leave a nice review, thanks!

NIGHTAXIANS VIDEO YOUTUBE PODCAST:

Night photographers Tim Little, Mike Cooper and I all use Pentax gear. We discuss this, gear, adventures, light painting, lenses, night photography, creativity, and more in this ongoing YouTube podcast. Subscribe and watch to the Nightaxians today!

SOCIAL MEDIA:
Ken Lee Photography Facebook Page (poke your head in, say hi, and “like” the page if you would, uh, like)
Instagram

PODCAST:
Behind the Shot video podcast – interview February 2020

VIDEO PRESENTATION:

How We Got the Shots: Five Photographers, Five Stories – Night Photo Summit 2022

VIDEO INTERVIEW:

Ken Lee’s Abandoned Trains Planes and Automobiles with Tim Little of Cape Nights Photography
Conversation about night photography and my book with Lance Keimig of National Park At Night

ARTICLES:
A Photographer Captures Haunting Nighttime Images of Abandoned Buildings, Planes, and Cars in the American Southwest – Business Insider by Erin McDowell
A Photographer Explores Southern California’s Desert Ruins – Los Angeles Magazine article by Chris Nichols


The fearless first female night photographer

Who is the female night photographer who also happened to be the first published woman photojournalist in the United States? Let’s find out more about this fearless, intrepid force of nature.

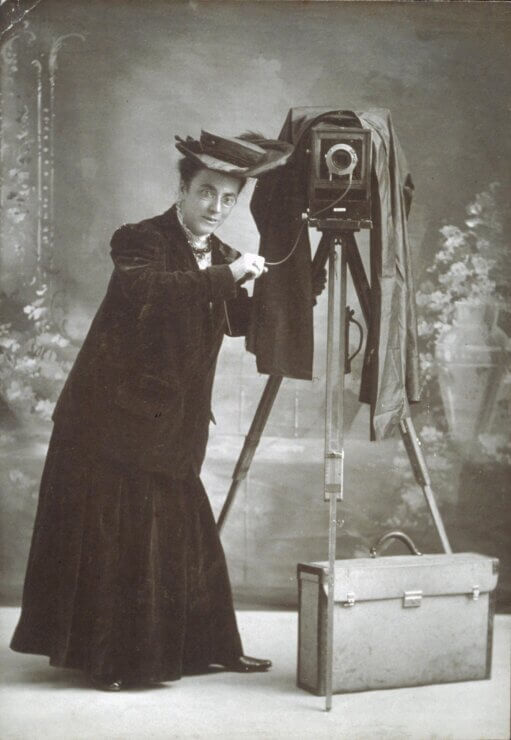
Jessie Tarbox Beals

Jessie Tarbox Beals, first female photojournalist and night photographer
Jessie Tarbox Beals, first female photojournalist and night photographer (Schlesinger Library, Radcliffe Institute at Harvard University)

The early 1900s were a time in which most women’s roles were confined to the home. If women were photographers at all, this was confined to indoor portrait studios. 

This, however, didn’t stop Jessie Tarbox Beals. 

No fear

Jessie Tarbox Beals, first female photojournalist and night photographer (National Gallery of Art Library, Washington DC)
In front of the Austrian Government Building at the Louisiana Purchase Exhibition, 1904. Jessie Tarbox Beals, first female photojournalist and night photographer (National Gallery of Art Library, Washington DC)

Beals set herself apart by working outdoors and in situations thought to be “too rough” for a woman. She took some of her photojournalism photos from ladders, hot air balloons, and platforms, hauling fifty pounds of 8 x 10″ equipment and glass plate negatives with her. 

Beals seemed indomitable. She photographed in all conditions, including fires, floods, and winds so strong she had to sit on her 50-pound camera to keep it from flying away. She straddled speeding cabs, scaled telephone poles, and climbed dusty bookshelves to get her photos.

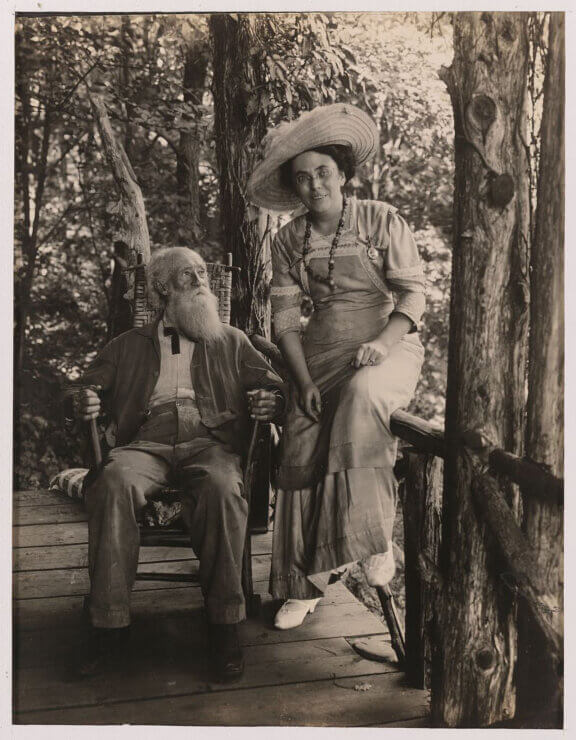
Jessie Tarbox Beals, first female photojournalist and night photographer, with John Burroughs (Library of Congress)

During this period, Beals photographed suffrage marches, women’s jobs, female-run shops and restaurants, poor living conditions of immigrant families, and women’s rights. A go-getter, she also photographed Calvin Coolidge, Teddy Roosevelt, Herbert Hoover, Mark Twain, Ida M. Tarbell, General Pershing, and Fannie Hurst.

Full-time news photography

In 1902, Jessie became a full-time professional news photographer. The editor of Buffalo, New York’s two local papers, the Buffalo Inquirer and The Courier hired her, allowing her to freelance as well. She was proud of her ability to get into difficult-to-photograph places, some of which were proclaimed off-limits to news photographers. And she did this all while hauling her heavy camera equipment with her, taking pride in her physical conditioning and ability to promote herself.

Tenacity and fearlessness at the World’s Fair

She was probably best known for covering the 1904 St. Louis World Fair, where she was the first woman to be given credentials. Due to her ability to hustle and promote herself as well as her sheer tenacity, she ultimately became the official photographer at the Fair for the New York Herald, Tribute, and Leslie’s Weekly, three Buffalo newspapers, and all the local St. Louis newspapers as well as the Fair’s own publicity department. Here too, she climbed ladders and flew in hot air balloons to get her photos. She also photographed dignitaries at the event, photographing William Howard Taft and President Roosevelt through pure tenacity. She eventually accompanied Roosevelt as a member of his Presidential party and accompanied him to a reunion of the Rough Riders in 1905.

If one is the possessor of health and strength, a good news instinct … and the ability to hustle, which is the most necessary qualification, one can be a news photographer.

Jessie Tarbox Beals

About those hot air balloons

Even after using hot air balloons, she was still denied riding one. At the 1907 International Balloon Race in St. Louis, she was told that she couldn’t ride one because it was too dangerous for a woman. However, as one began lifting off, “the huge crowd was thunderstruck to see [Beals], a camera slung over her shoulder, grip the top of a basket and pull herself aboard,” according to the Philadelphia Public Ledger.

Explosive night photography

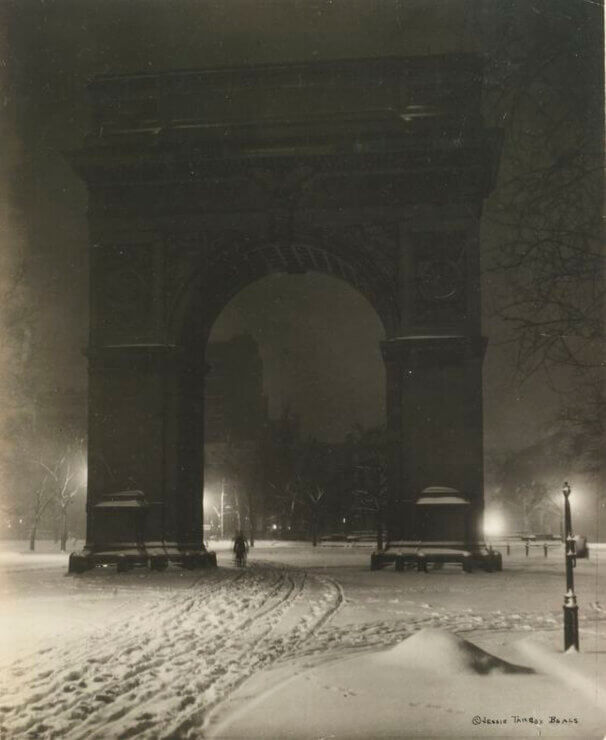
Washington Arch, New York, NY. Jessie Tarbox Beals, first female photojournalist and night photographer (Schlesinger Library, Radcliffe Institute at Harvard University)

Of course, we had to get to her night photography. It’s in the title, after all.

She teamed up with freelance writer Harriet Rice, teaching herself to use flash powder to make photos at night. Naturally, she was one of the first female photographers to use this as well!

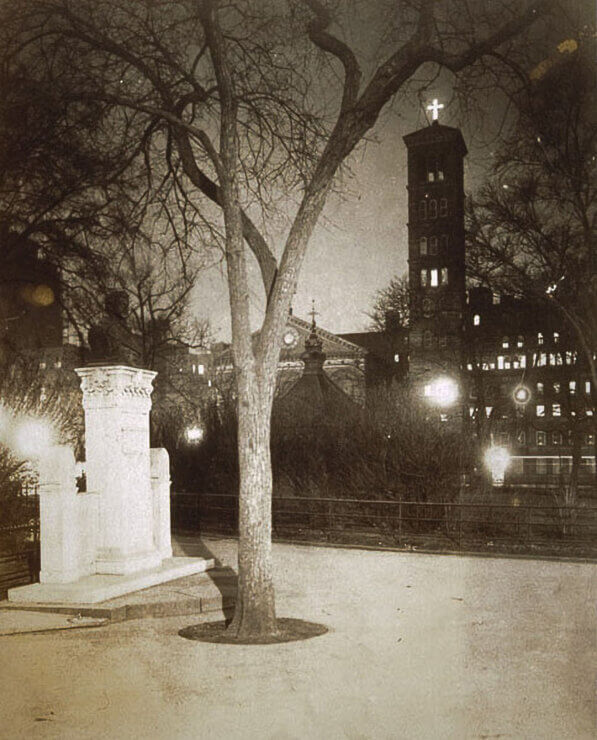
New York, NY. Jessie Tarbox Beals, first female photojournalist and night photographer (Schlesinger Library, Radcliffe Institute at Harvard University)

If you are thinking that using explosive magnesium chlorate flash powder to illuminate her photographs could get a night photographer in trouble, you’d be right on the mark. But Beals was not shy about using flash powder. She attempted to photograph a special group exiting a theatre from a stoop across the street, allegedly using two pounds of flashlight powder, about four times the usual amount. The New York American reported:

The explosion of an over-charge of flashlight powder set off by two photographers, one of them a woman, just as crowds were poring out of the Garrick Theatre, caused tremendous excitement and considerable damage. Windows in several houses were broken, scores of families, brought out of bed by the detonation, which rang through three blocks, came scurrying into the street, some of them in their bedclothes.

The New York American

The explosion was sufficiently terrifying that Palmer Hunt, head of the Iron Workers Association, thought this was an attempt on his life as his windows shattered.

In comparison, modern-day night photographers using an LED flashlight seems rather mild.

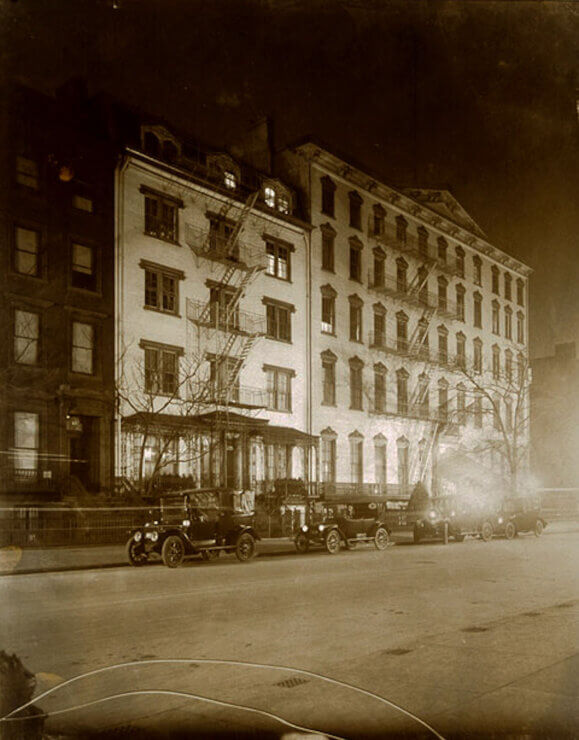
New York, NY. Jessie Tarbox Beals, first female photojournalist and night photographer (Schlesinger Library, Radcliffe Institute at Harvard University)

What Beals used for night photography

If Beals was willing to haul her cumbersome 8 x 10″ view camera up ladders, stoops, platforms, and hot air balloons, you can be sure that she used the same equipment at night. Already challenging during the day, such equipment would have been doubly so at night. Her basic kit included a large view camera, lenses, a heavy wooden tripod, holders, and heavy glass plates.

In light of this, it’s humorous to think about how we night photographers so often clamor for a mirrorless camera or a carbon fiber tripod instead of a chunkier DSLR or aluminum tripod.

Archives of Jessica Tarbox Beals

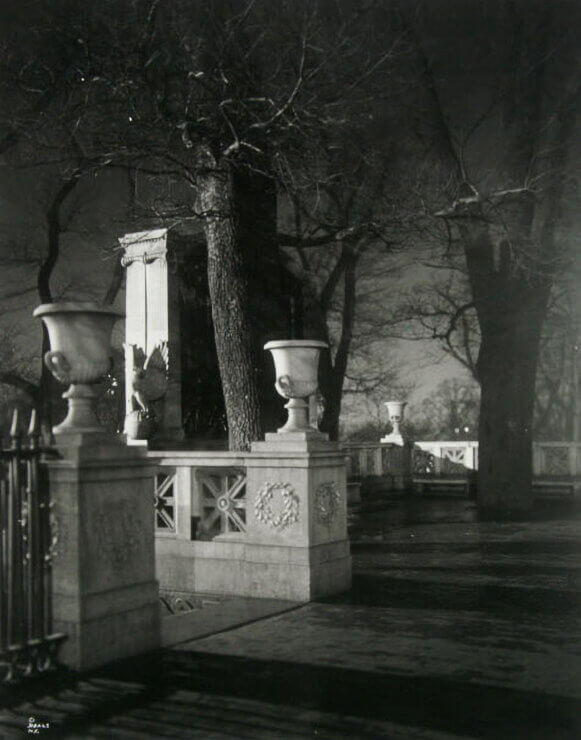
New York, NY. Jessie Tarbox Beals, first female photojournalist and night photographer (Schlesinger Library, Radcliffe Institute at Harvard University)

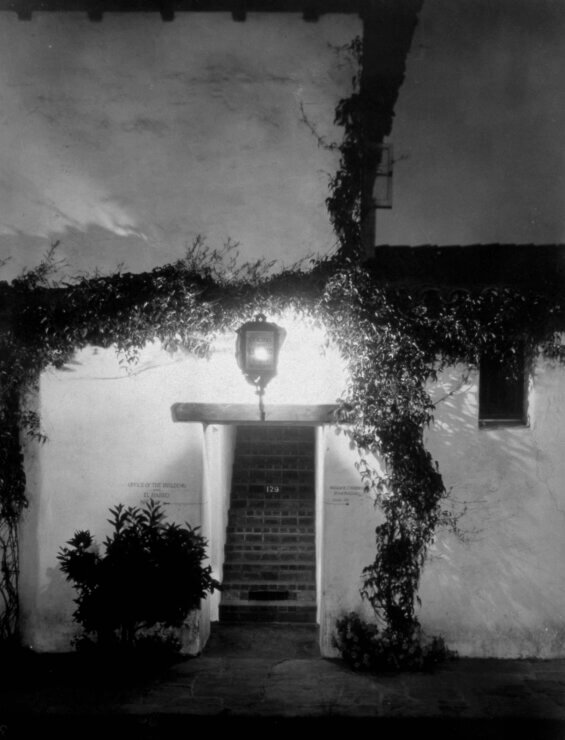
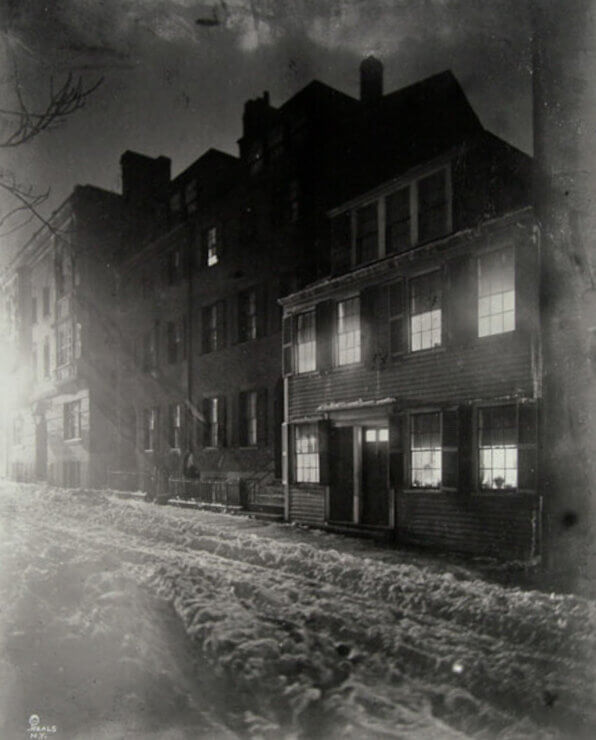
The archive of her work at the Schlesinger Library, Radcliffe Institute at Harvard University contains over 100 prints of her night images. These include photographs of New York and the World’s Fair, Boston’s Beacon Hill neighborhood, and later, the Mission-style architecture in Santa Barbara after she moved to California in 1922.

Santa Barbara, CA. Jessie Tarbox Beals, first female photojournalist and night photographer (Schlesinger Library, Radcliffe Institute at Harvard University)

Motivation for night photography

Boston, MA. Jessie Tarbox Beals, first female photojournalist and night photographer (Schlesinger Library, Radcliffe Institute at Harvard University)

Gifted night photographer and historian Lance Keimig at National Parks at Night notes that little is known about why Beals created night photos or how she may have been inspired to begin it in the first place. She may have been aware of night photographer Alfred Stieglitz, who was creating nocturnal images in the same area as she was at the time. 

Regardless, Beals deserves attention for her pioneering role in photojournalism and night photography as well as the excellent quality of her images. And she certainly deserves enormous credit for accomplishing this while upending gender-based obstacles through her tenacity and courage.

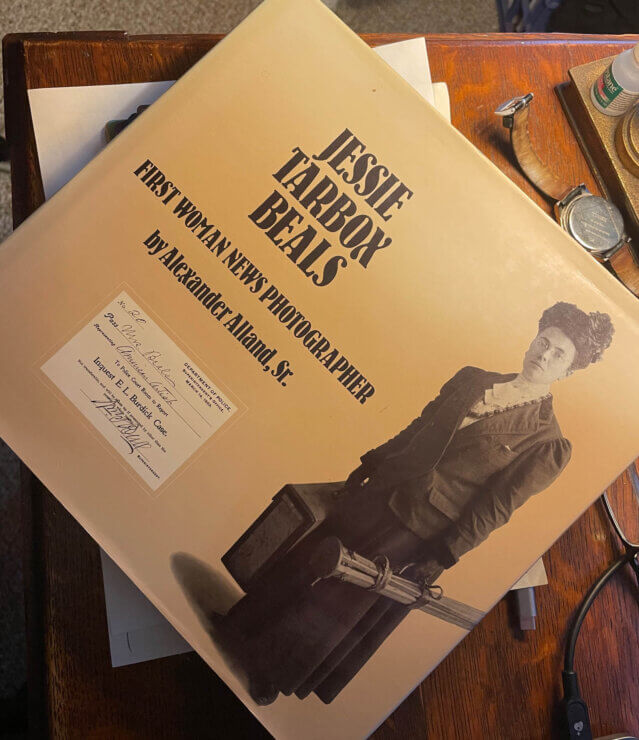
Book about Jessica Tarbox Beals

Book: Jessie Tarbox Beals: First Woman Photographer by Alexander Alland, Sr. (photo courtesy of Lance Keimig)

After Beal’s passing, photographer Alexander Alland, Sr. purchased many of her prints and negatives. He published a biography about her, Jessie Tarbox Beals: First Woman News Photographer, in 1978.

“Her career was remarkable by any standard. But for a woman at the turn of the century, it was practically unheard of.”

Alexander Alland, Sr.

How I got the photo: Abandoned car overlooking city lights

How did I create a night photo of a mysterious abandoned car overlooking Los Angeles? I’ll tell about the adventure and the techniques.

Finding the car

Many times, I’ve mentioned how I use various sleuthing methods, extensive reading, and Google Earth to find strange abandoned objects. Here, though, I stumbled across this by mistake! 

I was photographing the alleged Zodiac Car near Spahn Ranch, a Corvair rumored to be the infamous car driven by Bruce Davis. He was the “right-hand man” of Charles Manson during that infamous time.

The alleged Zodiac Car near Spahn Ranch, a Corvair rumored to be the infamous car driven by Bruce Davis for the Manson family.

On the way back, I zigged when I should have zagged. This was a happy accident, as I stumbled across this car. It was immediately obvious that people had set up a dirt bike ramp so they could launch themselves onto and over the vehicle.

I also loved the way it looked forlornly over the city lights of Los Angeles. I knew I would return to photograph this soon.

Returning to the car

Some months later, I hiked the half-mile trail just after sunset, going up and down the mountain trail to the car. I had brought my camera, lots of drinks, and a few snacks. I had taken GPS coordinates the last time I was here. However, I didn’t seem to need it since I figured it out quickly based on the shape of the mountains.

Abandoned car overlooking the city lights of Los Angeles. 69 seconds f/9 ISO 200.

The challenge of the lighting angle

When I light paint, I prefer to have the angle of the light be consistent with the brightest light source. In this case, that was the moon and the city spread out below. And I loved the way the moonlight looked on the car. I wanted to replicate the same angle so that it would look natural, only brighter and more pronounced.

The difficulty in doing that was that there was a dirt bike ramp in front of the car. In order to really get the angle correctly, I would have to get up high enough to shine the light over the bike ramp. This would be difficult to do because I would have to not only get in the frame, but also extend my flashlight high up, almost pointing back at the camera, but somehow not shine it into the lens.

If I had been smart, I would have brought a piece of cardboard like Mike Cooper does, using it as a light modifier to block the light from going into the lens. However, it was a little late for that. I improvised and held my camera bag in front of the flashlight instead. It was far more clumsy and difficult, but I eventually got it to work.

Lighting the interior

My original plan was to light the interior with a warm white light. However, it looked indistinguishable from the rest of the car. I decided on a whim to use teal instead, which I had previously done with the Zodiac Car. This would thematically tie them together as well.

I ducked behind the car and shined the teal light inside briefly to light it up. I lit the dashboard from an angle to create some interesting shadows and maximize the details.

Lighting the ground

I stood up on the trail above the car and gently lit the surrounding hill behind it with warm white light. If I hadn’t done this, it would have been extremely dark, and I wanted some context and detail.

About this unusual scene

We often see panoramas of city lights, but rarely with an abandoned vehicle, particularly with no road in sight. It creates a jarring juxtaposition. There used to be crude dirt roads higher up in the mountains. During the day, if you look closely, you can discover some of the roads because the dirt is packed down more in certain areas. People used to ditch stolen vehicles here, sometimes rolling them off the hillside. This is most likely why this car is here.

After taking the photo, I hiked the half-mile trail back to the car in the moonlight. It’s surprising how bright moonlight can be, and even though the trail went up and down through the rocky mountain, I was able to hike almost the entire trail without using my headlamp.

Camera settings

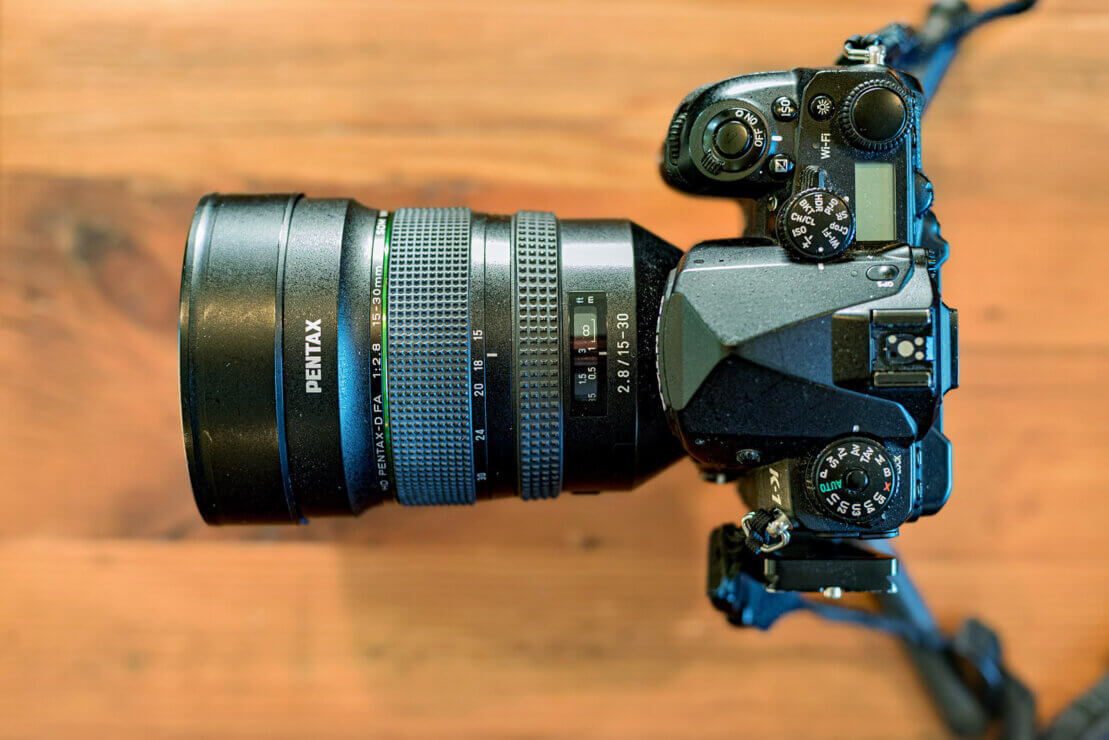
The exposure was 69 seconds at f/9 ISO 200. I used a slightly smaller aperture than usual to create more of a flare from the moon and city lights below, but also so I could have more time to run around and light paint the scene. I used a Pentax K-1 and a 15-30mm f/2.8 lens on a Feisol CT-3342 carbon fiber tripod and Accratech GP-s for the photo.

VISIT ME, VISIT ME!

BOOKS AND PRINTS:
Head on over to the Ken Lee Photography website to purchase books or look at night photography and long exposure prints and more.  My books are available there and Amazon, Barnes and Noble, Target, Booktopia, Books A Million, IBS, and Aladin. If you enjoy the book, please leave a nice review, thanks!

NIGHTAXIANS VIDEO YOUTUBE PODCAST:

Night photographers Tim Little, Mike Cooper and I all use Pentax gear. We discuss this, gear, adventures, light painting, lenses, night photography, creativity, and more in this ongoing YouTube podcast. Subscribe and watch to the Nightaxians today!

SOCIAL MEDIA:
Ken Lee Photography Facebook Page (poke your head in, say hi, and “like” the page if you would, uh, like)
Instagram

PODCAST:
Behind the Shot video podcast – interview February 2020

VIDEO PRESENTATION:

How We Got the Shots: Five Photographers, Five Stories – Night Photo Summit 2022

VIDEO INTERVIEW:

Ken Lee’s Abandoned Trains Planes and Automobiles with Tim Little of Cape Nights Photography
Conversation about night photography and my book with Lance Keimig of National Park At Night

ARTICLES:
A Photographer Captures Haunting Nighttime Images of Abandoned Buildings, Planes, and Cars in the American Southwest – Business Insider by Erin McDowell
A Photographer Explores Southern California’s Desert Ruins – Los Angeles Magazine article by Chris Nichols


Top 3 second-hand camera gear picks for savvy photographers

What are top three second-hand camera gear picks for you to purchase? And why is that? We discuss this and more.

Cameras

I’ll start with the big one first: Cameras. When camera manufacturers release new models, their older models invariably drop in price. However, this doesn’t mean older models are suddenly obsolete, or that suddenly, their image quality is bad. After all, National Geographic photographers were producing jaw-dropping images with digital cameras ten or fifteen years ago. So yes, a gently used camera, digital or film, will do quite well.

Pentax K-1 and 15-30mm f/2.8 lens, both purchased second-hand for significantly less than their new price.

Some people get hung up on shutter counts. I have purchased numerous cameras second-hand, and never come close to approaching the 100,000 to 200,000 shutter actuations that camera shutters are rated for. Also, they frequently last far longer than that. And if you are purchasing a camera that doesn’t have a flapping mirror, well, that doesn’t even matter.

Currently, I use a Pentax K-1 and a Nikon D750. Both were purchased used. Both are DSLRs. Both are many years old, have survived countless dusty desert encounters and night photography trips. And they still produce stellar images.

Robus RC-5570 tripod and RTH-1050 ballhead.

Tripods

Want to save a lot of money on an important piece of photography gear? Look no further than tripods. Purchase a high-end tripod second-hand, and it will hold up your camera and lens for many years.

If you purchase a great tripod, it will outlast your cameras. Most people will go through numerous cameras during the course of their photographic journey. But they will often have the same tripod, if it’s a good one. And really, if you are going to perch hundreds or thousands of dollars of gear on a tripod, shouldn’t it be a good one?

I personally don’t care if a tripod has a few dings or scratches. Who cares? If you purchase a new one, it’ll have wear marks soon enough anyway. What I do care about is whether it deploys easily and quickly, is rock solid, and is reliable.

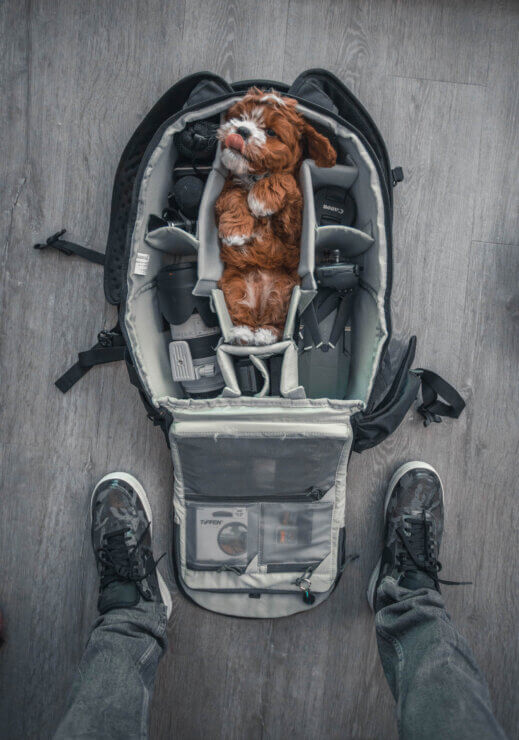
Chances are you won't get a cute puppy when you purchase your camera bag used. But if you want one, be sure to ask. Photo by Roberto Nickson on Unsplash
Chances are you won’t get a cute puppy when you purchase your camera bag used. But if you want one, be sure to ask. Photo by Roberto Nickson on Unsplash.

Camera bags

Great camera bags are comfortable, keep your gear dry and safe, and offer strong organization so you can find everything quickly. Unfortunately, great camera bags often cost hundreds of dollars.

Unless you purchase them used.

You can often purchase used camera bags for a fraction of what they initially cost. I regularly see camera bags for 75% of their original price. They typically arrive quite clean, from my experience, but if they’re not, either clean them yourself or take them to your local laundry cleaners. I’ll happily clean a bag if I save two hundred dollars or more.

Photo by Christelle BOURGEOIS on Unsplash
Where should you purchase used camera gear? Hmmmmmm. Photo by Christelle BOURGEOIS on Unsplash.

Where to purchase used items

Networking is great. I’ve purchased or traded camera gear with my friends. That’s a fun, organic way of doing it which is mutually beneficial.

Obviously, you can take your chance with eBay or Mercari. If you do this, try to go with a seller who has been doing it for a while and has a near 100% rating. You’ll see comments about whether they provide good communication. I’ve had excellent luck with this.

Scary times purchasing used

I did have one scare, however. I purchased my Nikon D750 DSLR camera used from Amazon. It came with a Pluto trigger and several batteries as well, all for a great price. However, when I received the box, I was surprised to hear clunking from within. Opening the unpadded box, I was shocked to see that the camera had a thin layer of bubble wrap around it but otherwise loose in a box more than double its size. No other bubble wrap, newspaper, “peanuts” or anything. 

Even worse, none of the batteries or the Pluto trigger were wrapped. All were bouncing around loose in the box. My heart sank. I thought for sure something was damaged. I inspected everything. Incredibly, everything worked despite bouncing around freely in the box. I am still using all this gear years later. But caveat emptor.

A safer way to purchase gear? I like the sound of that. Double Arch, Arches National Park, Utah. Used Nikon D610 camera.

A safer way to purchase

Another way to purchase used is to purchase at reputable places such as MPB. Large places such as this inspect the equipment carefully. Some of them, such as MPB or KEH, also have repair facilities. And most places have warranties on their used items, such as MPB’s six-month warranty. 

And of course, you can never overlook B&H for used photography gear. They are a large second-hand tech seller that is headquartered in New York City. Visiting there is almost a rite of passage for photographers on the East Coast.

One sure thing is that when you purchase from these retailers, you can be really sure that you will not receive your camera and batteries bouncing around inside an unpadded box.

Selling your gear for other gear, servicing, and warranties

Even better is to sell some gear to one of these places for credit. This is convenient and takes the sting off the price even more.  I’ve sold my Nikon lenses to MPB in the past. The whole process could not have been easier.

I’ll discuss MPB since I’ve done business with them recently. For each product, they provide an assessment of the condition, what’s in the box, and a warranty. If you want, you can lower the cost by trading in some of your old gear. They are very thorough in evaluating used equipment. However, that’s one aspect that makes them a good place to purchase used gear.

They go through all the gear, clean it up and then sell it. And you get to see a photo of the actual piece of gear you are purchasing. They also service their warranties in-house. They have a five-star review on Trustpilot with over 29,000 reviews. Chances are, they’re doing something right.

Convenience and safety

If you want convenience and want to maximize your chances of purchasing used gear that works like new, purchasing from places such as these is the way to go.

I’ve purchased cameras, tripods, camera bags, cases, lights, flashes, lenses, photography books, and more – all used. Over time, I’ve saved thousands of dollars. And that’s a beautiful thing.

More thoughts on purchasing second-hand

If you want to read more on purchasing cameras used, you may want to read Getting great cameras for cheap: Buying used. And of course, if you want to read about the Best places for purchasing used camera equipment, you’ll want to click on that.

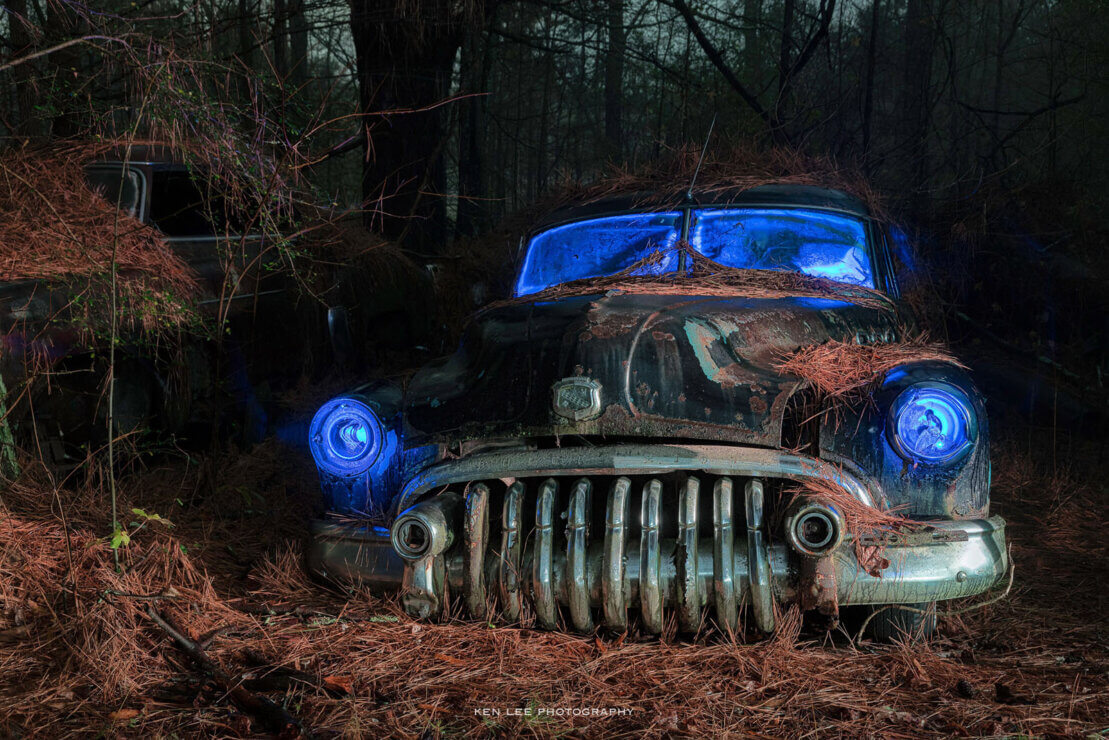
Light painting a Buick in Old Car City USA, Georgia
You can purchase gear, even vintage gear, second-hand. But don’t let your experience be unsettling. Long exposure night photo of classic Buick with handheld light painting.

What photography gear have you purchased used? And where is your favorite places to purchase them? Leave your thoughts in the comments!

VISIT ME, VISIT ME!

BOOKS AND PRINTS:
Head on over to the Ken Lee Photography website to purchase books or look at night photography and long exposure prints and more.  My books are available there and Amazon, Barnes and Noble, Target, Booktopia, Books A Million, IBS, and Aladin. If you enjoy the book, please leave a nice review, thanks!

NIGHTAXIANS VIDEO YOUTUBE PODCAST:

Night photographers Tim Little, Mike Cooper and I all use Pentax gear. We discuss this, gear, adventures, light painting, lenses, night photography, creativity, and more in this ongoing YouTube podcast. Subscribe and watch to the Nightaxians today!

SOCIAL MEDIA:
Ken Lee Photography Facebook Page (poke your head in, say hi, and “like” the page if you would, uh, like)
Instagram

PODCAST:
Behind the Shot video podcast – interview February 2020

VIDEO PRESENTATION:

How We Got the Shots: Five Photographers, Five Stories – Night Photo Summit 2022

VIDEO INTERVIEW:

Ken Lee’s Abandoned Trains Planes and Automobiles with Tim Little of Cape Nights Photography
Conversation about night photography and my book with Lance Keimig of National Park At Night

ARTICLES:
A Photographer Captures Haunting Nighttime Images of Abandoned Buildings, Planes, and Cars in the American Southwest – Business Insider by Erin McDowell
A Photographer Explores Southern California’s Desert Ruins – Los Angeles Magazine article by Chris Nichols


Solving night photography problems: I can’t find my camera!

Suddenly, I heard the frantic crunching of footsteps coming toward me. The figure whipped around the flashlight. 

“Have you seen a camera on a tripod? I was doing a time-lapse and now cannot find it!”

Finding cameras in the dark of night

It was easy to see how he could lose his camera. Mesquite Flat Sand Dunes is a sea of sand dunes that stretch on for miles. And particularly in the dark, the sand dunes can begin to look alike after a while.

I never saw his tripod-mounted camera. Hopefully, he found it.

But this taught me an early lesson. I had just begun doing really long exposures at night, photographing star trails. Therefore, I wanted to come up with a strategy that would avoid this very thing. I came up with several.

Three ways to make your tripod visible

1. Reflective tape

My first inclination was to use red and white reflective tape. The concept was simple. If you couldn’t find your tripod, walk around while moving your flashlight around. You would see red and white shining back at you. This could work from a quarter mile away or more if you had a straight line of sight. I tested this one night and it worked extremely well.

2. Glow in the dark tape

Although the first method worked, I had a concern. What if I were attempting to locate the camera, but waving around the flashlight ruined my photo? While this had never happened, I thought that I might come up with another method first. Enter glow-in-the-dark tape.

Glow in the dark tape cannot be seen from as far away as shining a light on reflective tape. However, it can still be seen from relatively far away, especially if you shine your light on it before using it to make it glow. Up to now, I have never lost my camera. However, I feel comforted in seeing where my tripod is from relatively far away.

3. Blinking light

I use a Vello Shutterboss wired external intervalometer. When set, this produces a faint blinking red light. It’s bright enough that there are some photographers who tape over the light when doing high-ISO night photography, such as for Milky Way. I’ve never had an issue with this personally, but it’s good to mention it. Regardless, this is another way that my tripod is visible.

A number of night photographers I run into use blinking LED lights tied onto their tripods. I have never done this. However, it’s also a good idea. These lights can come in different colors as well, such as the beautifully named Kick Me Nots made by Astrogizmos. Or look for blinking LED lights that might work for you.

Mistakenly hitting or kicking your tripod

Discussing Kick Me Nots provides an excellent segue into another bonus of making your tripod visible. Probably just about all of us night photographers have kicked or run into our tripod at one time or another. Having blinking lights or glow-in-the-dark tape really help to make the tripod considerably more visible.

Any time we can lessen the chance of plowing our tripod over or kicking one of the legs and ruining a long exposure photo is a beautiful thing.

VISIT ME, VISIT ME!

BOOKS AND PRINTS:
Head on over to the Ken Lee Photography website to purchase books or look at night photography and long exposure prints and more.  My books are available there and Amazon, Barnes and Noble, Target, Booktopia, Books A Million, IBS, and Aladin. If you enjoy the book, please leave a nice review, thanks!

NIGHTAXIANS VIDEO YOUTUBE PODCAST:

Night photographers Tim Little, Mike Cooper and I all use Pentax gear. We discuss this, gear, adventures, light painting, lenses, night photography, creativity, and more in this ongoing YouTube podcast. Subscribe and watch to the Nightaxians today!

SOCIAL MEDIA:
Ken Lee Photography Facebook Page (poke your head in, say hi, and “like” the page if you would, uh, like)
Instagram

PODCAST:
Behind the Shot video podcast – interview February 2020

VIDEO PRESENTATION:

How We Got the Shots: Five Photographers, Five Stories – Night Photo Summit 2022

VIDEO INTERVIEW:

Ken Lee’s Abandoned Trains Planes and Automobiles with Tim Little of Cape Nights Photography
Conversation about night photography and my book with Lance Keimig of National Park At Night

ARTICLES:
A Photographer Captures Haunting Nighttime Images of Abandoned Buildings, Planes, and Cars in the American Southwest – Business Insider by Erin McDowell
A Photographer Explores Southern California’s Desert Ruins – Los Angeles Magazine article by Chris Nichols